You have a shiny new PC running Windows 10. It’s been using it for a while now, and everything is fine. Then, without any sign, the hard drive or SSD moves south. The problem is that you haven’t backed up to OneDrive, any other cloud storage service, or an external device. Sure, you can bring your device if it’s still under warranty and get a replacement, but the warranty won’t restore your files. so what are you doing?
In case your Windows PC hard drive or SSD fails, you can recover your files and data with Linux Live CD/USB.
Let’s start by listing the tools you’ll need:
- Linux Live .ISO file.
- A free program called Rufus – a reliable tool for formatting USB with the source
- USB / Blank CD for Linux Live ISO Mode (You will get the same with USB or CD, just change the boot priority depending on the media of your choice)
- Another USB drive to put the recovered files on.
for note: The USB drive must be formatted for the recovered files in FAT32 format.
Recover Windows Files Using Linux Live USB / CD
Linux is an open source operating system (OS). Live CD or Live USB allows you to use an operating system on your computer without installing it on your computer. Once you create a Live USB, you insert it into your shutdown computer, start your computer, and configure it to boot from the USB. The Linux operating system and all of its programs remain on the USB key. It is not installed on your computer, but it will allow you to access all the hard drives on your computer.
How to get Linux Live ISO file
There are many system rescue discs – and in this article we will refer to the Ultimate Boot CD. It’s free to download and comes with several programs and tools for disc burning, data recovery, memory, CPU, and BIOS testing.
Once you have downloaded UBCD and Rufus (the easiest and fastest way to create bootable USB devices), you can now follow the steps below to create a bootable Linux USB.
How to Create a Bootable Linux USB Drive
- Open the already downloaded Rufus file.
- Make sure you have selected the correct USB drive. This process will completely erase the USB drive. Rufus will already be set to the correct setting you need. Click the Select button to choose our UBCD .ISO (see screenshot below).
- When File Explorer opens, navigate to where you saved your UBCD .ISO and double-click it to select it.
- Now click File to start button.
- You will receive a prompt that all data on the USB drive you selected, “…will be destroyed”.
- click Okay Complete.
Rufus will start creating the bootable USB. You will see a progress bar below condition Section of the interface Rufus.
When the status bar indicates Readyclick close (see screenshot below). Your UBCD bootable USB drive is now ready.
Now you can follow the steps below to recover your files using a USB drive.
How to boot your computer with a Linux Live USB drive to recover your files
There are several ways to boot with a USB drive depending on your computer. Basically, when you turn on your computer, you need to press a specific key, or combination of keys, to boot into BIOS and change the default boot drive of the USB flash drive.
Once you restart your computer with UBCD, you will see a text menu. Use the arrow keys to move down separate magic and press the Enter key to select it.
A text menu will appear for you to choose one or the other;
- Default settings (run from RAM) or
- Live with default settings.
If one doesn’t work, try the other. You will now see the desktop environment (see screenshot below).
In the upper left corner you will see files manager. It is the equivalent of UBCD for Windows Explorer. Double click to open it.
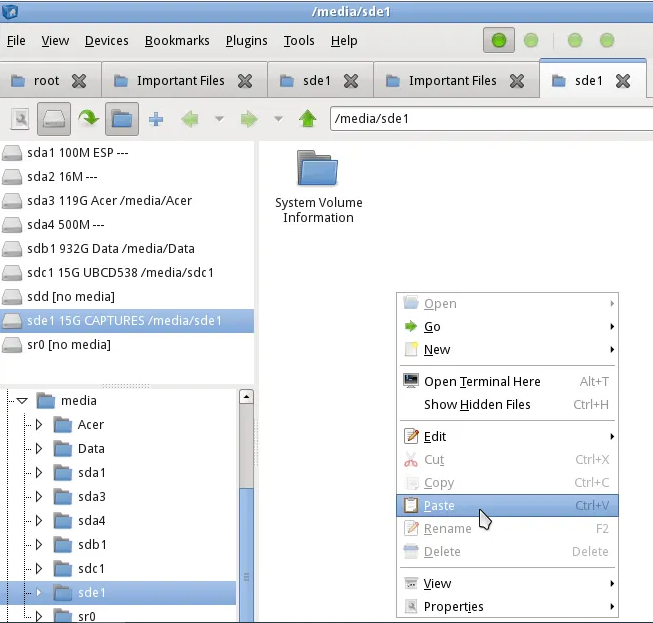
You will see multiple drives on the left side of the file manager. You will look for a folder called windows.
Now explore the folder to find the files. Click on Users > your account Where your account is your account username.
there you will see my filesAnd my picturesAnd office. headquarters. center, etc. This is where you will find the files you want to recover. Select the files/folders, right-click and copy them, just as you would in the Windows environment.
Then in the left pane, locate and select the other USB drive, right click and paste it in the right pane.
You now have your files on the USB drive.
Exit the file manager and click on the Start menu button in the lower left corner of the desktop environment.
click sign out. A prompt will open, click Turn off the computer.
You can now safely store your USB flash drive with recovered files!

“Certified gamer. Problem solver. Internet enthusiast. Twitter scholar. Infuriatingly humble alcohol geek. Tv guru.”


